Unordered List

Play PES 2015 Online with your friends

Play PES2015 online and challenge your friends on PS4

Start your blog easily in few clicks

Create a professional blog without any experience and start making money

Get paid iPhone apps for free, Legally!

App trackers allow you to legally track changes in price for many, if not most, apps available on the iTunes App Store

Install Kali Linux in dual boot with Windows

Learn how to have Kali Linux installed in dual boot with your Windows and take profit of the distibution functionalities

Youtube: FIVE Tips and tricks for the fatest use

If you think you know everything about YouTube, Check out these Fast Five tricks...

How To Hack iPhone's Lock Screen to Access Photos, Contacts...


 A new iPhone exploit has recently been discovered by YouTube user videosdebarraquito, who has found many other exploits and bugs in iOS over the years. This new exploit allows someone to bypass the lock screen and gain access to contacts and photos via Siri, Apple's digital voice assistant,but it only affects the iPhone 6s and the iPhone 6s Plus because it requires 3D Touch functionality.

 How To Hack iPhone's Lock Screen to Access Photos, Contacts...


 How to Access the Bug


 - The first step in the flaw begins with asking Siri to search Twitter for an email address.
 - Once the results pop up on screen, the next step is to find one with a valid email address and use "force touch" to bring up the menu.
 - Once you select the "Add Existing Contact" option, you now obtain access to all of the contacts stored on the phone, without a passcode or Touch ID !

 Another part of this flaw occurs when you select the "Create a New Contact" option in the same menu after using the 3D Touch feature. Once chosen, you can then add a new picture to the contact, thereby obtaining access to all of the photos on the device.

 See also: How to Enable Multitasking in iOS 9

 How to Fix It


 Thankfully, there's a two-step process that you have available to fix this latest issue.
 1/ Go into your Settings, then select the Privacy tab and choose Photos. Then disable Siri's access from there if it's present. This keeps would-be intruders out of your pictures.

 2/ Go back into Settings, then select Touch ID & Passcode. After you've entered your passcode, scroll down and switch off the option that gives Siri access.

 Source: EverythingApplePro YouTube Channel

How to recover deleted photos in iOS


 When you delete a photo in iOS 8, it's not actually gone, at least for a short time. Any image you delete sits in a special folder called "Recently Deleted," where you can retrieve it within 30 days. If you've deleted a photo by mistake, don't panic, take a look through our extremely simple walkthrough to learn how you can save your precious pic.


How to recover deleted photos in iOS

How to save a deleted image

 Head to your iPhone's Camera Roll and click on the Albums icon at the bottom-right of the screen. Next, click the Albums option at the top-left of your display. 

How to recover deleted photos in iOS


Clicking this will bring you to your main "Albums" menu display, showing your Camera Roll, videos, any favorites you've added and, crucially, your Recently Deleted folder. 

How to recover deleted photos in iOS


 If you go into your Recently Deleted folder, you'll see all of your deleted images from up to 30 days ago. To restore an image back to your Camera Roll, click the specific image and tap "Recover" at the bottom-right of your screen. 

How to recover deleted photos in iOS


 You can also recover multiple images from the "Recently Deleted" folder view by clicking "Select" at the top-right of your screen, tapping each image you want to save (a blue tick will appear on each one) and then choosing "Recover" at the bottom-right. 

How to recover deleted photos in iOS

How to permanently delete images

 It's worth noting that you can also permanently delete images from the "Recently Deleted" folder. Simply select the image you want to delete and choose the delete option. There's no recovering these files, though, so be careful.

How to recover deleted photos in iOS


Have something to add ? Share it in the comments.

UPDATED: New Year Giveaway: We have a Winner !


 UPDATED On February, 16 2016
 We have a winner!
 Congratulations @, the winner of 7 MONTHS PREMIUM Kaspersky essential protection in our New Year's Giveaway contest!
 To claim your prize please send an email to: contact@tellmh.com or use our contact form within 5 days.
 Cheers,

 Our Next Giveaway will be on July or August !
 Stay tuned :)

 With our New Year's Day giveaway, TellMH.com decided to participate to protect your PC's against Viruses, Spyware, Worms, Trojans and more!


2016 New Year Giveaway: Win KASPERSKY Premium Contest

 We've launched a contest in partnership with Kaspersky Labs allowing TWO of our blog-readers to win 7 MONTHS PREMIUM essential protection for PC with Kaspersky Anti-Virus ! Worth 80$ US

2016 New Year Giveaway: Win KASPERSKY Premium Contest


 So, how do you enter?

 1/ Use comments below to tell us what's your favorite post on our Blog and why?
 2/ Like our Facebook page and comment the Facebook post of our contest (The pinned post at the top of the Facebook Page) with a message of your choice !
 The best TWO comments will earn the powerful security tool with the best Anti Virus Software: ''KASPERSKY'', that combine protection & efficiency without slowing down the Computer!
 And you’re all set! It’s as quick and easy as that.

 The contest takes place from NOW until February 15th.
 The TWO lucky winners will be announced HERE in this post and contacted via direct message.

 Good luck everyone, see you next month! :D

How to Take Screenshot on Android


 It may seem tricky to take screenshots on an Android mobile, but it isn't! Upon taking a screenshot the following message will be displayed "Saving screenshot...". You can view your screenshots by going to Gallery" > "Screenshots.


Take Screenshot / Screencapture on Android

 Method 1: (All Android devices)

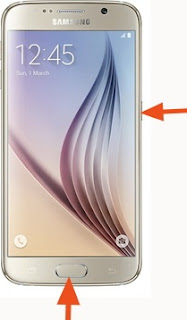
 Simultaneously press on the Home and Power button:
Take Screenshot / Screencapture on all Android devices

 You'll hear the camera shutter sound that indicates that the screenshot has been saved.

 Method 2: (Samsung Galaxy S5)

 Go to Settings > Motions and gestures > Capture screen.
 By enabling the Capture screen feature, you can take screenshots by swiping the side of your hand over the screen (from left to right or vice versa).
Take Screenshot / Screencapture on Android

 The screenshots are automatically saved in Gallery > Album > Screenshots.

 Method 3: (Samsung Note)

Press the button of the S-Pen stylus. A small circular menu (Air Command) will be displayed on your screen. Tap on Screen Write to take a screenshot of your current screen.

Take Screenshot / Screencapture on Android

 For Nexus, press simultaneously On/Off and volume button.
Take Screenshot / Screencapture on Android

 Have fun :)

Earn Money by Uploading and Sharing Files


 There are many ways to earn money on the Internet. You can create your own blog / website, sell your items, providing services such as SEO, make affiliate marketing, email marketing, become a SEO Consultant, publisher, critic and many other things to generate money from this virtual world.

 The upload, file hosting and sharing is one of the popular ways to earn money on the internet. There are many websites available where you can upload your files for free, get public links and share them with the world. You will be paid either by PPD (Pay-per-download), PPS (Pay-Per-Sale) or PPC (Pay-Per-Click) or both.

Earn Money by Uploading and Sharing Files

 In this post, I'll show you the 5 best hosting sites that are popular and especially legit.
 Read also: Earn 200$US Easily and Without any Experience

 1 - Uploaded :

 Uploaded is a very popular site ranked number 171 in the world ! The best hosting service with the best earning commissions (up to 30 per 1000 downloads).
 The site pays in Euro (€) !
 The website is very secure, comfortable and fast to download files and host them safely. It has an application to browse and download your files directly from your Android device.
 The site offers you reflink. When you signed up there, you will get your personal referral link, publish it on your blog, share it with friends and you'll earn 75% for the first sale and 65% for the following.


uploaded
 
 1000 downloads will be compensated country-specific as follows:
Earn Money by Uploading and Sharing Files
click image to open in full size


 2 - Userscloud :

 Userscloud offers unlimited storage space so you can access all your files from any device with an Internet connection, regardless of where you are.
 UsersCloud can be used in two ways: Without registration, allowing uploading up to 10 files simultaneously with a validity of 24 hours, or a formula that requires registration and providing unlimited lifetime for your files with up to 50 simultaneous uploads. Both are equipped with HTML codes to easily share data.
 Note that UsersCloud has an audio player for MP3 files.
 You earn 30% of what your referrals earn.
Earn Money by Uploading and Sharing Files
click image to open in full size


 3 - Hulkload :

 You can earn up to $ 4/1000 download with Hulkload. The site count downloads from all countries around the world. It is the ideal for small files (up to 200mb max).
 You can upload alot of files without being deleted.
 You can earn more on each sale of a premium account that allows important uploads and downloads. You earn 10% of what your referrals earn.
Earn Money by Uploading and Sharing Files
click image to open in full size


 4 - Depositfiles :

 DepositFiles is one of the best site to upload all types of files such as exe files, mp3, mpeg, avi, rar, zip, jpeg, games, documents, etc. You will get $ 5.00 bonus after registration. The site pays you $ 25 per 1000 downloads "by country and size of the file."
 You just need to sign up there for a free account, upload and share your files links with friends and clients.
 You can also earn by inviting your friends with your referral link. You will receive a 20% commission. Minimum payment is $ 10.
Earn Money by Uploading and Sharing Files
click image to open in full size


 5 -HulkImge :

 HulkImge is a new concept. You upload an unlimited number of photos and pictures for free, make alot of people see your images and earn money for every view ! Up to pay up to 40 $ for 10000 images views.
Hulkimge

 Hulkimge count views from all countries around the world. 10% earnings of each your referral for lifetime.
Earn Money by Uploading and Sharing Files
click image to open in full size

 That's it! Those were my best selection for you, trusted worldwide !
 It's a very specific category because few people use this type of way to make money on the net. You'll be obligy to generate a big volume in the aim to make earnings become profitable. Therefore, this activity is often reserved for webmasters who have the ability to share files with large volume.

 Do you like this earning system? Do you have other good hosting sites? Let us know them in comments below :)

How to Run Android Apps on Windows PC / MAC


 Want to install your favorite applications and play the most beautiful Android games on your Windows desktop, laptop or MAC...? You can run Android apps and even the Android operating system on your current PC using just what we call an Emulator.


andy_run_android_apps_games_pc_windows_mac_free

 Andy is the best Android emulator available. It provides an easy way to download and install Android apps and games for your Windows PC or Mac. All for FREE unlike BlueStacks and YouWave !
 
andy_bluestacks_youwave_run_android_apps_games_pc_windows_mac_free

 It also provides users with unlimited storage capacity, PC and Mac compatibility. Also, with phone as a joystick, you will never have to sacrifice the multi-touch or gyro elements of gaming, and thanks to seamless connection between desktop and mobile. You can receive a SnapChat phone picture on the street and see it on your desktop at home or even a Whatsapp or Viber message.

 Requirements:

 You need to be aware of certain requirements of Andy software which must be matched with your PC:
 1 - Your computer should be running on Windows OS which is Vista or any other higher like 7, 8, 8.1 or even 10. Windows XP won’t work in this case because it’s too old.
 2 - Check that your computer is having at least 4GB of RAM. If it’s just 2GB then you may face lots of performance issues.
 3 - Consider having at least 512MB or higher storage of graphics/video card.
 4 - Make sure that the graphics driver version is updated and compatible to play HD content pretty easily.
Check : Best Free Sources to Search and Download Drivers for your Computer
 Once you’re sure of these requirements then you won’t find any errors at all.

 Install ANDY and run Android apps and games on Windows PC or MAC for free:

 - Download and install Andy from Official Site.

andy_run_android_apps_games_pc_windows_mac_free


 - Make sure that the Virtualization is enables in the BIOS settings.
 Download Microsoft Hardware Assisted Virtualization Detection tool from official site here.

 - Tap on Apps icon and synchronize with your Google account’s e-mail and password..
 
andy_run_android_apps_games_pc_windows_mac_free

 - Open Google Play and search, for Candy crush for exemple, and install it.

 - Once installed, the Candy crush for PC application is ready to use which supports both Windows as well as Mac computers.
 Read also: How to Stream your Smartphone Screen (Android / iOs) on Your PC / MAC
 Enjoy running and installing all your favorite applications on your PC without any issues.
 Share your experience in comments below :)

Block Unwanted Calls on Android (NO ROOT)


 Block unwanted calls If you don't want to be bothered by phone calls when you are at work meeting, or just from a particular contacts and private numbers. Below are some simple tips that can help you avoid them with diffrent options.


how_to_block_unwanted_private_calls_android (NO ROOT)


 Reject a call with a message :

 You can easily reject an incoming call with a text message. Simply drag the small tab displayed below the call screen, choose a message and tap on Send to cancel the incoming call.
 You can have up to six different call rejection messages. To create a custom one, go to Settings > Device > Call > Set Call Rejection Messages and tap on the + button displayed next to Create new message.

 Create a call reject list :

You can create a call reject list to block unknown numbers or unwanted contacts. Calls made from numbers added to the reject list are automatically forwarded to your voice mail. Open the Contacts app and then tap on the Menu > Settings. Go to Call > Call rejection > Auto reject list. Tap on Create to create your call reject list.


 Add a number to the reject list :

 Tap on the Contacts icon and select the number from your contact list or call log. Alternatively you can use the Enter number field to add a specific phone number.

 Automatically block numbers matching specific criteria :

 You can also create a filter to block calls from phone numbers that match a certain criteria (specific region code, prefix...). Tap on Match Criteria and select a filter: Exactly the same as, Starts with, Ends with or Includes.
 Tap on Save to apply your new settings.

 Remove a contact from the reject list :

 If you changed your mind and want to allow calls from a blocked contact, then simply edit its corresponding entry in the reject list. Open the reject list and clear the checkbox appearing next to the contact your want to unblock to allow call and messages from the latter. If you want to permanently remove the selected contact from the reject list, then simply tap on the Trash icon displayed at the top right corner of your screen.

 Read: Why & How to Root your android phone easily

 How to Block Calls from Private Numbers:

 There's nothing more annoying than being harassed by calls or messages from private (hidden) numbers. But who are these people, how did they get your phone number and most importantly how can you prevent them from calling you again. This tutorial explains how to block calls or SMS from a private numbers on Android.

 Most of the front-end touch interface (HTC Sense, LG Optimus UI or Samsung TouchWiz) have a built-in feature to block incoming calls and messages from hidden number. The procedure may vary depending from one manufacturer to another, but in general you should be able to access this setting from the Phone app. Here's the procedure for the Samsung Galaxy S6:

 Open the Phone app, tap on the More button and go to: Call Settings > Call Rejection > Auto reject list then toggle the Unknown option On:
 
how_to_block_unwanted_private_calls_android (NO ROOT)

 Note: If your Android smartphone possess any option to block unknown numbers, simply download and install call blocking app such as Extreme Call Blocker or SMS and Call Blocker.

 Say goodbye to annoying people calls!:D
 Do you have any questions or suggestions? Let us know on comments below

How to Instantly Lock your PC / MAC


 When leaving home for few minutes and you want to lock your computer but don’t want to shut everything down, so that no one can access your data. Here’s the way to make the screensaver show up as soon as you lock your PC and you can then retrieve your session as you left it but you’ll have to enter the password to get back in.

How to Instantly Lock your PC / MAC

 How to instantly lock your Windows:

 First, make sure your screensaver is enabled (Right-click on the desktop > Personalize > Screen Saver)

 Method 1: (Recommended)

 1 - Press the Win+L keyboard keys simultaneously

How to Instantly Lock your PC / MAC

 2 - Your session is locked. On your return, enter your password to unlock it.

How to Instantly Lock your PC / MAC

 3 - You'll gain your session as you had left it: running softwares, opened documents...

 Method 2:

 Create a shortcut that will lock your computer:
 1 - Right-click on the desktop, choose New then click Shortcut.
 2 - Past this into the location box:
rundll32.exe user32.dll, LockWorkStation
 3 - The screensaver should show up instantly.


 How to instantly lock your MAC:

 First, make sure you have configured your Mac to ask for a password after sleep or screen saver. If you do not have the password required feature enabled, then follow these steps:
 - Launch System Preferences.
 - Open the ''Security & Privacy'' preference pane and select the ''General'' tab.
 - Click the checkbox next to ''Require password after sleep or screen saver begins'', you can select either immediately or a preferred time interval.

How to Instantly Lock your PC / MAC

 - Close System Preferences and you’re done.

 Now you are ready to lock your OS screen by putting the display to sleep performing either of the following:
 1- Hold down the Control+Shift+Eject keyboard keys together (if your Mac has an internal Optical Drive and an Eject key).
 2 - Hold down the Control+Shift+Power keyboard keys together (if your Mac does NOT have an internal Optical Drive or an Eject key).

 Note: This is not sleep mode so your Mac will still function, press any button to wake the display up and you should be asked to authenticate with your user’s password to unlock the screen.
 Tested on OS X Mavericks v10.9.1

How to Track Kids / Friends iPhone Without Them Knowing


 You still holding onto your kids being young enough to know where they are at all times? Need to know how to track a friends or your partner's phone and know exactly where they go after work? In this new post, i'll show you how you can monitor every movement of the person you're spying on. Not only that, but you can even set reminders for when they leave school or arrive a certain location!


 How to Track Kids / Friends iPhone Without Them Knowing


 First of all, you'll need to have access on their iPhone, then share their location to your iPhone without them knowing using a very simple application called Find My Friends (On iOS 9, Find My Friends is a stock app that will already be on the device).

 Step 1: Enable "Share My Location" on Their iPhone

 Open the Find My Friends app on their iPhone, then tap on their contact picture at the bottom to enable "Share My Location" from the settings.
 Also make sure that the location is being shared from "This Device" (under the "Share My Location From:" setting), as there may be other devices (like an iPad) that are attached to the same iCloud account.


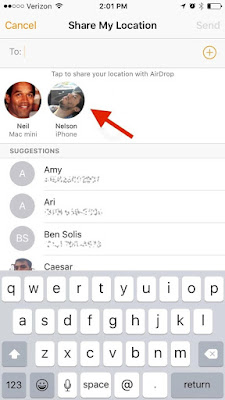
 Step 2: Share Their Location to Your iPhone

 On your iPhone, swipe up from the bottom of the screen to enable AirDrop from the Control Center. Make yourself discoverable to "Everyone", although the "Contacts Only" option will suffice as long as their iPhone has your contact information saved to it.
 Back on their iPhone, tap on "Add" (in Find My Friends) and hit your contact icon when it appears. Select "Share Indefinitely" to share their location to your iPhone for an unlimited amount of time.


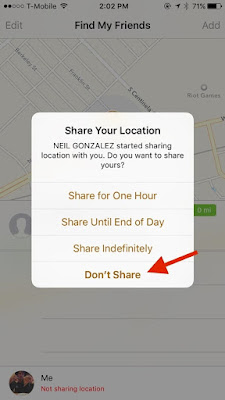
 Step 3: Accept Their Location; Don't Share Yours Back

 Once their location is shared to your device, hit "Accept." After a few seconds, a popup will appear asking if you want to share your location with them. Tap on "Don't Share" so that they can't track your location.


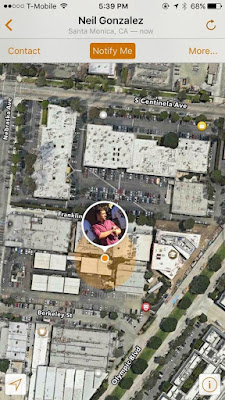
 Step 4: Track Their Location

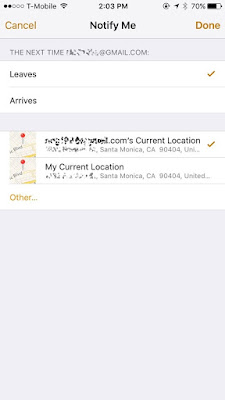
 In the Find My Friends app, simply click on their contact icon to see their exact location in realtime. You'll also see options to be notified if they leave or arrive at a certain location, so you can alert yourself when someone leaves their house or work.


 Step 5: Hide Their 'Find My Friends' App so that they don't even realize they have it

 Make sure the first page of your home screen is full and that the Find My Friends app is on the second page. Press and hold on any icon to enter edit mode, then drag the Find My Friends app onto any app on the first page to create a folder. When in the folder, remove the Find My Friends app and drop onto the dock and watch it disappear.

 Share the post if you like it, comment if you have questions :)
 Source: WonderHowTo

How To Backup and Restore SMS, CONTACT, PHOTOS, APPLICATIONS on Android


 Losing your Android device, breaking it or being stolen are unexpected things that can quickly arrive! If these incidents are always embarrassing, it is nevertheless possible to cushion the confusion by saving the contents of your smartphone or tablet! To do this, several solutions available to you. This post presents the simplest.


How To Backup and Restore SMS, CONTACT, PHOTOS, APPLICATIONS on Android

 Just like on the computer, make a backup of your data is an easy way to keep them if you have to change your Android device. This is simply about to save these data to an external storage medium, in the ocurrence an SD card.
 If Android does not initially saves data, many applications dedicated to this function are available on Google Play.
 Among the most reliable, we note Super Backup SMS & Contacts, Helium, Titanium Backup, My Backup Pro or Ultimate Backup Pro.

  1 - Super BackUp:

 Regularly updated, Super BackUp is among the fastest and most intuitive Backup apps. It will allow you to keep your text messages, your contact list, your call history, calendar and bookmarks. The application also allows you to save your application data, provided that your device is ROOTED.

  Read: Why & How to Root your android phone easily

  Still can't root? Check this post: Root any Android device manually like a Pro !

 - Download, install the application and start it:
 Google Play Link
How To Backup and Restore SMS, CONTACT, PHOTOS, APPLICATIONS on Android

 - Select the type of data you want to save from the menu:

How To Backup and Restore SMS, CONTACT, PHOTOS, APPLICATIONS on Android

 - Now hit ''Backup''
How To Backup and Restore SMS, CONTACT, PHOTOS, APPLICATIONS on Android

 - Validate the name of the default backup file, or choose another one.
By default, data is saved to the internal memory of your phone. Therefore, it's necessary to change the destination directory to the SD Card!
How To Backup and Restore SMS, CONTACT, PHOTOS, APPLICATIONS on Android

 - For more security, you can send your data to your mailbox by selecting "Send To Email". When you want to restore your data, simply choose again the data type and then select "Restore" and designate the backup to restore.

 Super Backup can serve you in case you change your device. You will now simply install the application again to access your Backups stored on the SD card. This feature is also useful when you change ROM or if you ever want to reset your device to factory settings.

 If your device is Rooted, the process will be the same to save your apps and their data.

 2 – Google Sync:

How To Backup and Restore SMS, CONTACT, PHOTOS, APPLICATIONS on Android
 Google allows you to save your data directly to your Google account from a device to another.

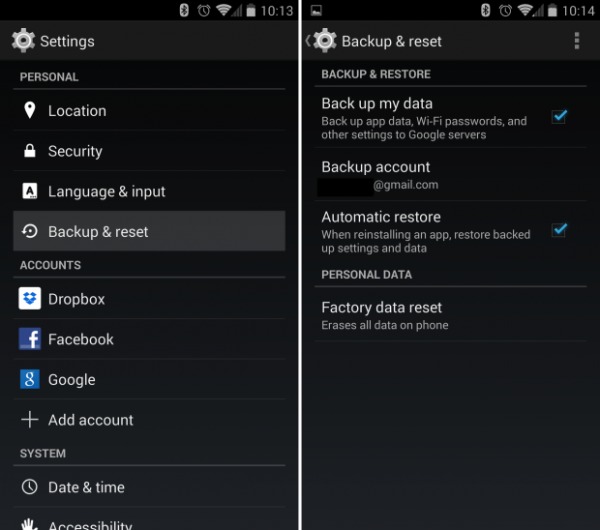
 For that, nothing simpler. Go to ''Settings'' on your device, select the "Accounts" tab, choose your Google Account, then select the data you want to backup.

 However, this feature does not allow you to save your SMS, and photos.

 3 - Save your photos and videos on the cloud, Dropbox or Google +

 One of the simplest ways to keep your photos and videos and store them on internet. To do this you simply put them online on social networks like Instagram or Google +, which offer unlimited storage space. In addition, Google + retains the original quality and size of your photos.

How To Backup and Restore SMS, CONTACT, PHOTOS, APPLICATIONS on Android

 The fastest is Dropbox, just download it from Google Play, choose the setting: automatically upload photos / videos taken by the camera of your Android device. However, Dropbox is limited by default to 5GB.

 Read on our Blog: How to use OneDrive


 4 - Manual BackUp:

 The latter might seem obvious, but remember that it is useful to manually transfer important data on different devices: by connecting to the PC via USB, or by inserting your MicroSD into your PC to drag and drop files of your choice.
 A manual backup per month would be a good compromise that will just cost you a few minutes and you will avoid tearing your hair in case of loss or break.

 And you, what solution do you use? Share your opinion in comments below :)